Kate Spain designs are fantastic, the patterns are interesting and fun, but I must say that the colors in this fabric line “Paradiso” are incredibly amazing and fresh. And that’s a lot to say when you see those color palettes used previously in her other lines. Paradiso is an upbeat, funky, island-ish collection full of grays, pinks and blues. What a combo, I truly LOVE it!
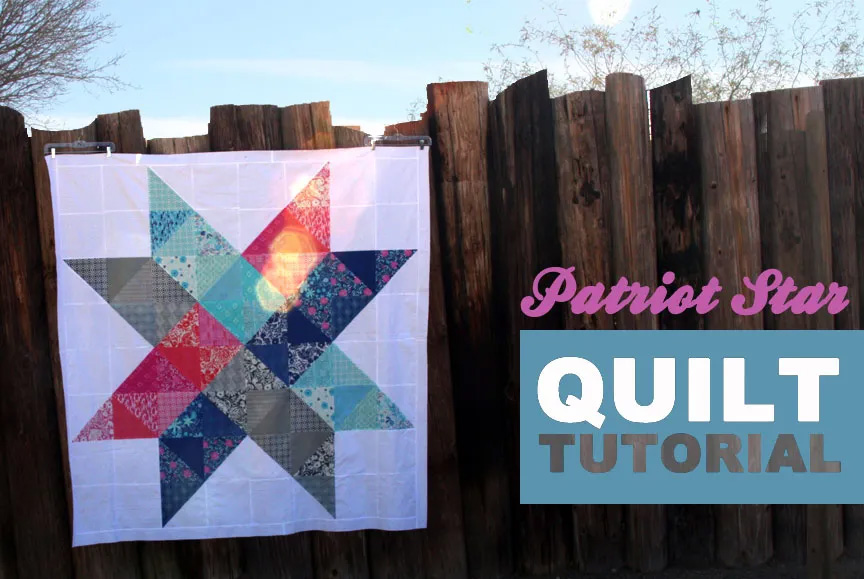
I recently realized I’ve had a layered cake of this line in my stash. That only meant that I needed to use it in my next project or create a new one so it could be put to use. I found a picture of the patriot star quilt online on Desert Sky Quilts and for this pattern I needed a layered cake. It was my lucky day! For a moment, had second thoughts on the fabric selection, only because this pattern was made up of woven bars of color. Naturally this would look much better with solid colors and many of the fabrics in Paradiso have white patterns on them. This can causes the design to blend into the background, but that did not stop me. I honestly wish I had used solid colors for this project, however I still love how this quilt came to be.
It’s always great to experiment and try new things. This project is incredibly easy to make and this pattern would be very suitable and user friendly for a beginner and/or intermediate quilter. The block used is a half square triangle. One of my favorite blocks to work with. I am constantly amazed at the endless possibilities that this offers. YOU SHOULD TRY IT and share the end product.


The Patriot Star Quilt
The fundamental block in the Patriot Star Quilt design is the half square triangle which finishes at 9.5”. To make a half square triangle, pair two 10” squares together. Draw a line down the middle and sew on both sides of the line. The drawn line will be your cutting. Using your rotary cutter and ruler, cut on the line. Open and press flat. (I showed this technique in a post about the Moda Love Quilt) You will need 5 different colors values.

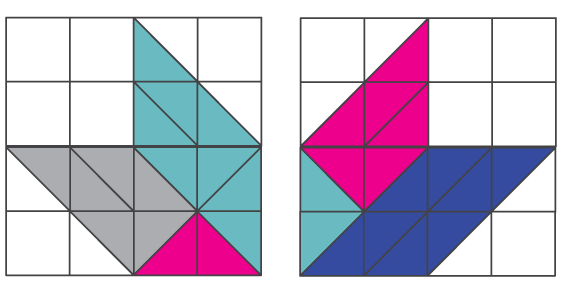
Make the following squares:
Sew 4 squares together to make the following rows.


Then sew the following rows together to make the following blocks.


Sew the top two blocks together. And then sew the bottom two blocks together.

Sew the two rectangles together and complete the main part of the quilt front. I added a 3-inch border around all sides to ensure the points wouldn’t get covered up by binding. Yeah, now I can take this quilt off of my to-do list. I hope you like it as much as I do.


The Comments
Susan
Thanks for the ping! I love your quilt. I think the prints are perfect in it. It’s like Monet – just stand back a little and it’s all in focus! Thanks, too, for the easy to follow directions. This was the next one on my list to make, and you’ve taken all the work out of it for me. =)
Susan
Thanks for the ping! I love your quilt. I think the prints are perfect in it. It’s like Monet – just stand back a little and it’s all in focus! Thanks, too, for the easy to follow directions. This was the next one on my list to make, and you’ve taken all the work out of it for me. =)